HI GUEST
  HAVE FULL ACCESS TO THE FORUM AND BE ABLE TO DOWNLOAD STUFF


 Publications


 Location
Posted Thu Oct 22, 2015 12:02 pm

POPULAR
[size=76]amazon offers new users a “free tier” of service that provides a VPS “micro-instance” at no cost for one year.
Hope this info help you to create vps
requirements:[/size]
[size=76]
1.mobile number
2.debit card(dont worry amazon use your debit card to just verify your details)
thats it
Step 1(create account in amazon)
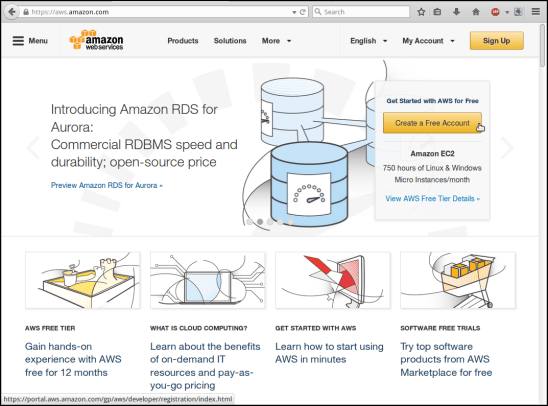
is to create a user account on AWS. Go to the [size=76][You must be registered and logged in to see this link.] click on “Sign up for AWS Account”
then, click on “Create a free account”.[/size]
[size=76]follow the directions provided on the (aws) web site to set up a user account. You need to have a mobile phone for identity verification.[/size]
[size=76]If you already have an account on amazon.com, you can use your already existing account to log into (aws) services.
and log in[/size]
[size=76]step 2( Select datacenter location)
Select the datacenter where your instance will be created. when you are experimenting with a free VPS, you should choose the datacenter closer to your location.[/size]
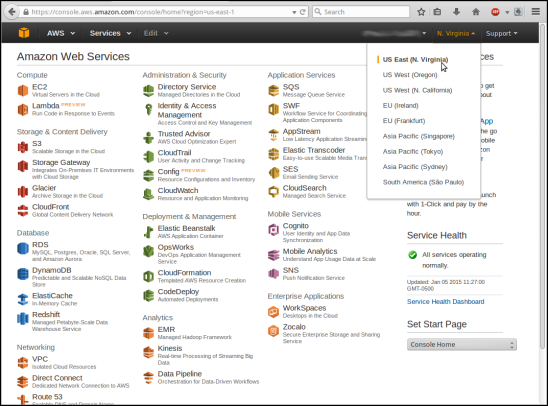
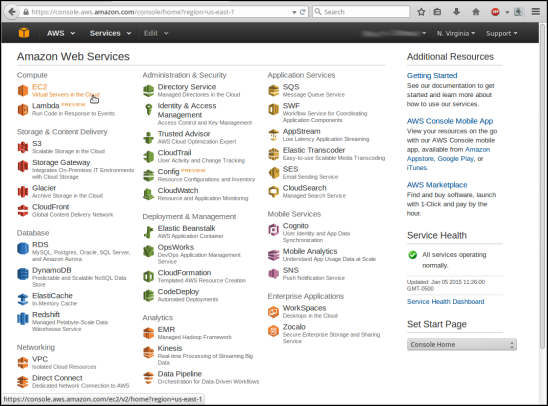
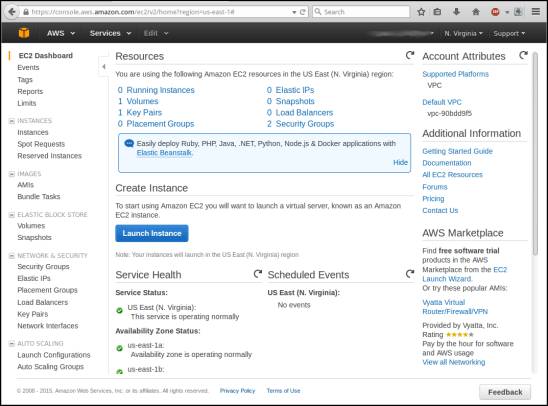
[size=76]Step 3 ( Use the Elastic Compute (EC2) service)[/size]
[size=76]Click on “EC2” in the upper-left corner of the AWS portal page.[/size]
[size=76]STEP:4 ( Choose base image)[/size]
[size=76]Click on big “Launch instance” button. You will see the available instance types.[/size]
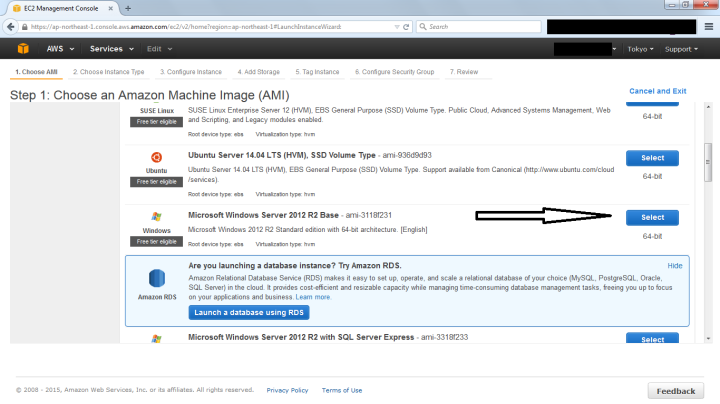
[size=76](AFTER LAUNCHING INSTANCES YOU CAN EITHER CHOOSE WINDOWS OR LINUX HERE I GO WITH WINDOWS AS MOST PEOPLE USE WINDOWS)[/size]
[size=76]STEP:5
Select Microsoft Windows Server 2012 as the Machine Image[/size]
[size=76]STEP:6
Select a t2.micro, with 1G memory, Then click on Configure Instance Details in the lower right hand corner.[/size]
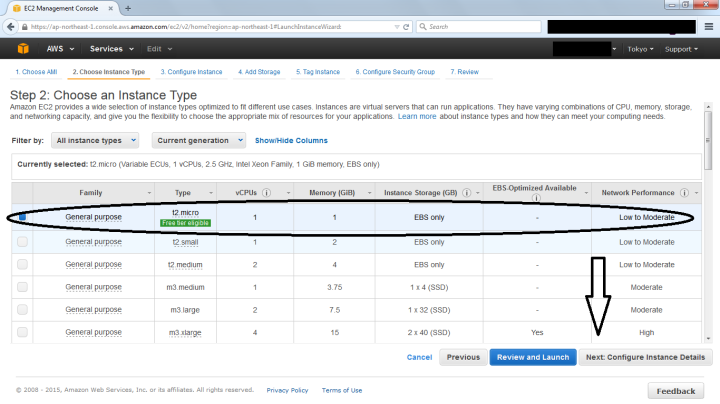
[size=76]NOTE: Here just click on REVIEW AND LAUNCH[/size]
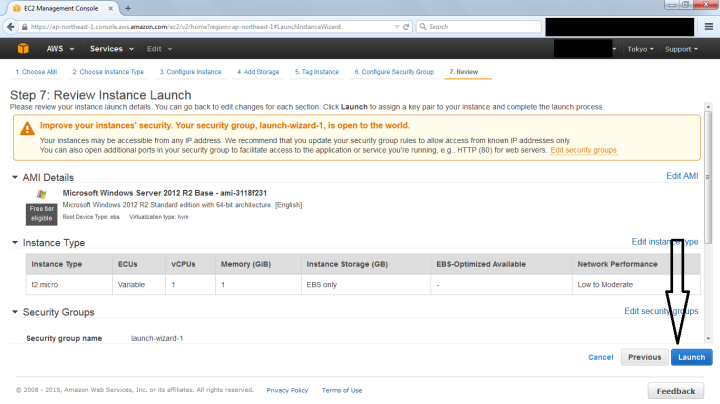
[size=76]STEP:7
Review the instance settings, and then Click on Launch[/size]
[size=76]STEP:8
Select Create a New Key Pair, Give the Key a name, Download Key Pair[/size]
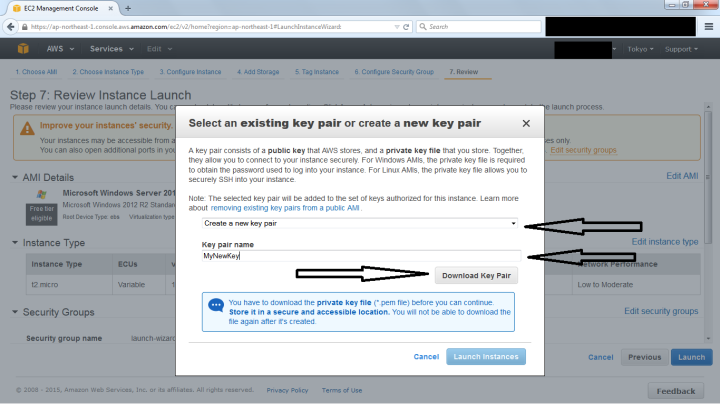
[size=76]Save the new key Then click on Launch Instances
[/size]
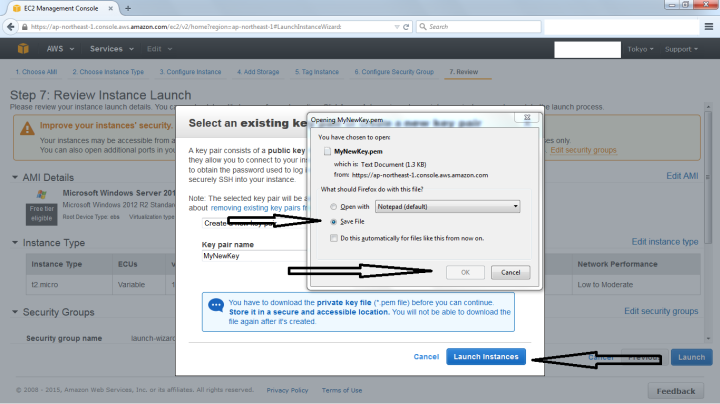
[size=76]NOTE:save the file on desktop so it is easy to locate[/size]
[size=76]STEP:9
Your Instance will now be launched. Click on the Instance identifier to get back to the main EC2 Management Console[/size]
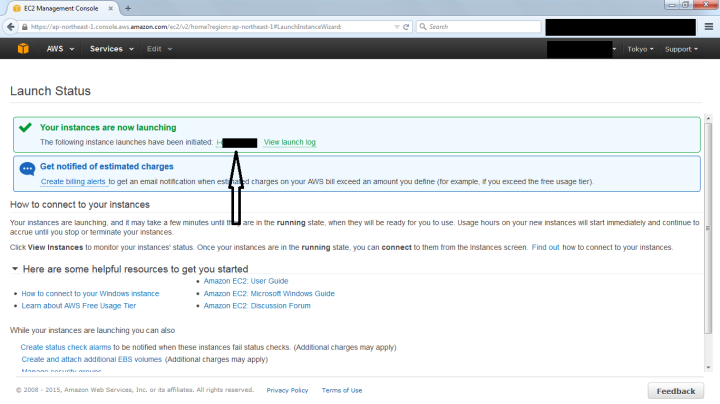
[size=76]NOTE:AFTER THIS STEP REST FOR 2 MINUTES IT WILL TAKE TIME TO INITIALIZATION[/size]
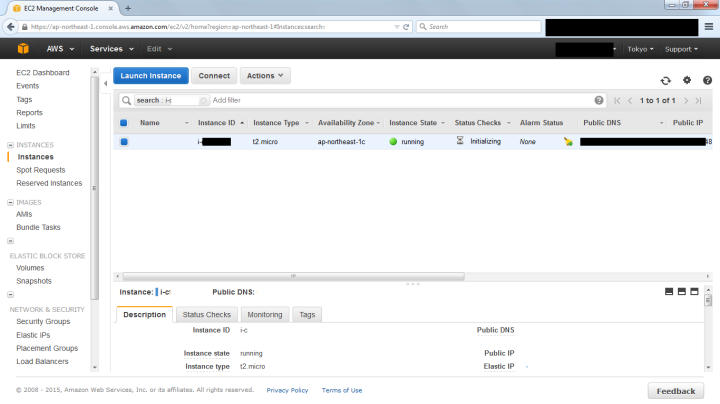
[size=76]STEP:10
After initialized click on connect[/size]

[size=76]STEP:11
Click on download remote desktop file[/size]
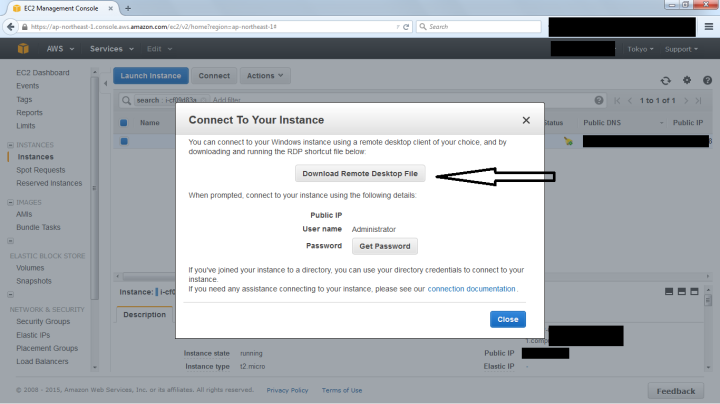
[size=76]NOTE:SAVE THE FILE TO DESKTOP AS IT IS EASY TO LOCATE[/size]
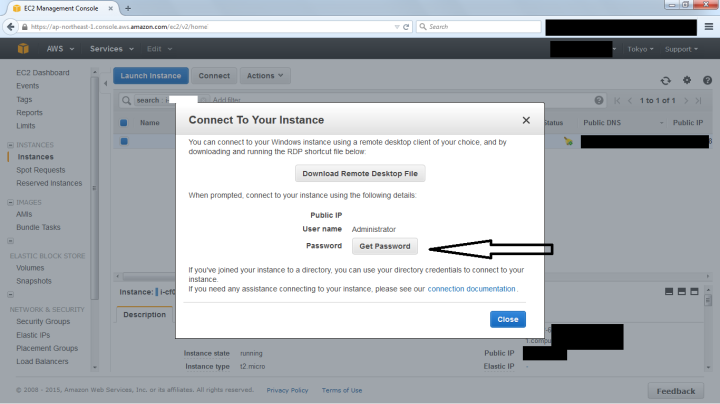
[size=76]STEP:12
Now click on get password[/size]
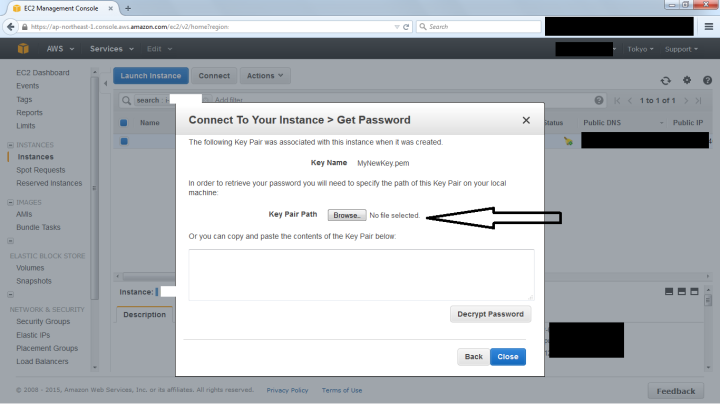
[size=76]Click on Browse and select the Key you downloaded earlier.[/size]
[size=76]Click on decrypt password[/size]
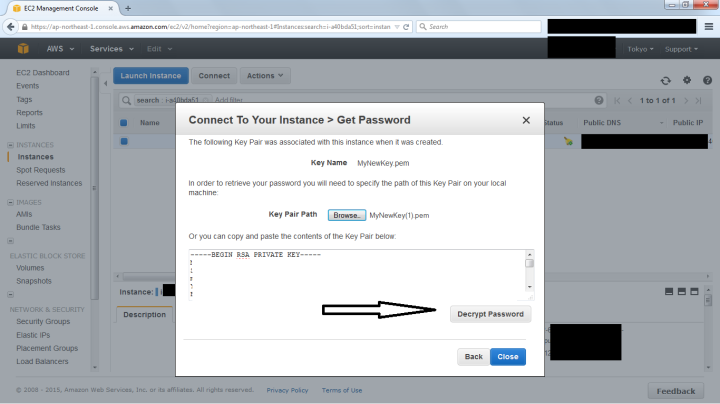
[size=76]You will then be shown the password for your new Amazon VPS[/size]
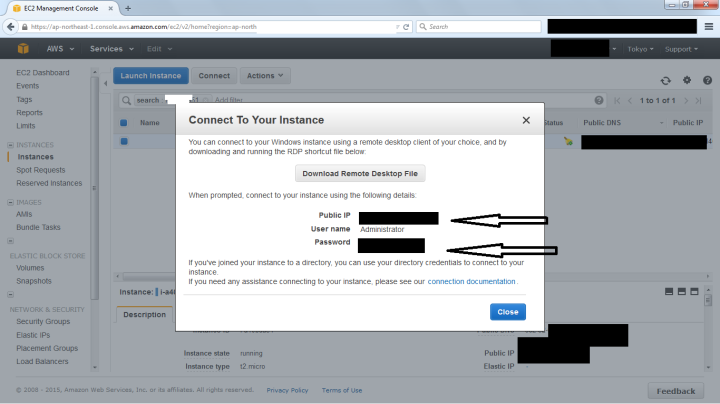
[size=76]NOTE: HERE NOTE THE IP AND PASSWORD U HAVE TO USE IT AFTER STEPS[/size]
[size=76]Now we will connect to your new EC2 instance. Browse to the Remote Desktop File you downloaded earlier and double click on it.
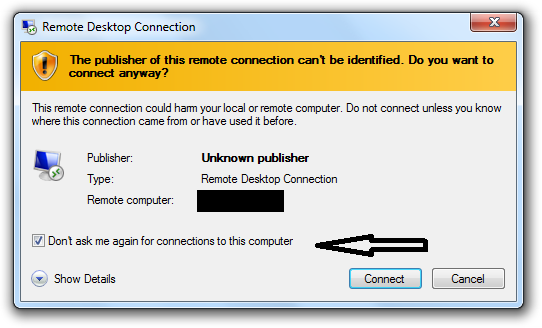
Select Don’t ask me again, and click on Connect[/size]
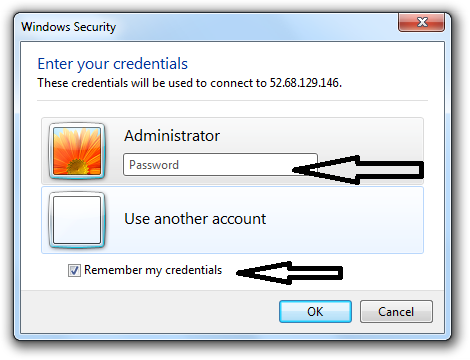
[size=76]Now enter the password that u got when u decrypt the password just enter here[/size]
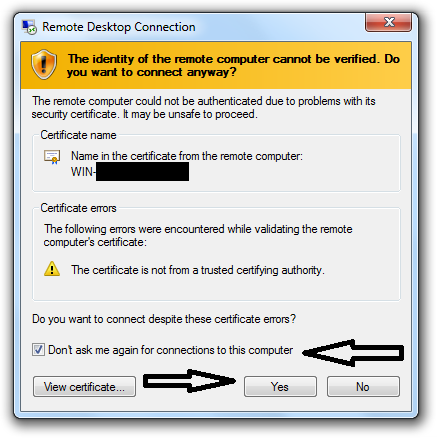
[size=76]Select Don’t ask me again, the click on YES[/size]
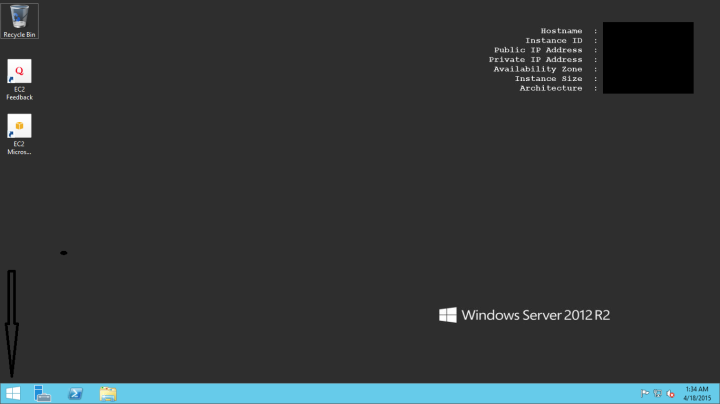
[size=76]After a short delay, the VPS will create your desktop and you will be logged in. Click on the menu button in the lower left hand corner.[/size]
[size=76]THATS IT FRIENDS YOU GOT YOUR VPS
HAVE A NICE DAY[/size]
Hope this info help you to create vps
requirements:[/size]
[size=76]
1.mobile number
2.debit card(dont worry amazon use your debit card to just verify your details)
thats it
Step 1(create account in amazon)
is to create a user account on AWS. Go to the [size=76][You must be registered and logged in to see this link.] click on “Sign up for AWS Account”
then, click on “Create a free account”.[/size]
[size=76]follow the directions provided on the (aws) web site to set up a user account. You need to have a mobile phone for identity verification.[/size]
[size=76]If you already have an account on amazon.com, you can use your already existing account to log into (aws) services.
and log in[/size]
[size=76]step 2( Select datacenter location)
Select the datacenter where your instance will be created. when you are experimenting with a free VPS, you should choose the datacenter closer to your location.[/size]
[size=76]Step 3 ( Use the Elastic Compute (EC2) service)[/size]
[size=76]Click on “EC2” in the upper-left corner of the AWS portal page.[/size]
[size=76]STEP:4 ( Choose base image)[/size]
[size=76]Click on big “Launch instance” button. You will see the available instance types.[/size]
[size=76](AFTER LAUNCHING INSTANCES YOU CAN EITHER CHOOSE WINDOWS OR LINUX HERE I GO WITH WINDOWS AS MOST PEOPLE USE WINDOWS)[/size]
[size=76]STEP:5
Select Microsoft Windows Server 2012 as the Machine Image[/size]
[size=76]STEP:6
Select a t2.micro, with 1G memory, Then click on Configure Instance Details in the lower right hand corner.[/size]
[size=76]NOTE: Here just click on REVIEW AND LAUNCH[/size]
[size=76]STEP:7
Review the instance settings, and then Click on Launch[/size]
[size=76]STEP:8
Select Create a New Key Pair, Give the Key a name, Download Key Pair[/size]
[size=76]Save the new key Then click on Launch Instances
[/size]
[size=76]NOTE:save the file on desktop so it is easy to locate[/size]
[size=76]STEP:9
Your Instance will now be launched. Click on the Instance identifier to get back to the main EC2 Management Console[/size]
[size=76]NOTE:AFTER THIS STEP REST FOR 2 MINUTES IT WILL TAKE TIME TO INITIALIZATION[/size]
[size=76]STEP:10
After initialized click on connect[/size]
[size=76]STEP:11
Click on download remote desktop file[/size]
[size=76]NOTE:SAVE THE FILE TO DESKTOP AS IT IS EASY TO LOCATE[/size]
[size=76]STEP:12
Now click on get password[/size]
[size=76]Click on Browse and select the Key you downloaded earlier.[/size]
[size=76]Click on decrypt password[/size]
[size=76]You will then be shown the password for your new Amazon VPS[/size]
[size=76]NOTE: HERE NOTE THE IP AND PASSWORD U HAVE TO USE IT AFTER STEPS[/size]
[size=76]Now we will connect to your new EC2 instance. Browse to the Remote Desktop File you downloaded earlier and double click on it.
Select Don’t ask me again, and click on Connect[/size]
[size=76]Now enter the password that u got when u decrypt the password just enter here[/size]
[size=76]Select Don’t ask me again, the click on YES[/size]
[size=76]After a short delay, the VPS will create your desktop and you will be logged in. Click on the menu button in the lower left hand corner.[/size]
[size=76]THATS IT FRIENDS YOU GOT YOUR VPS
HAVE A NICE DAY[/size]
Last edited by vidyarthi2766 on Thu Oct 22, 2015 3:49 pm; edited 4 times in total